> For the complete documentation index, see [llms.txt](https://myty.gitbook.io/myty-kit/llms.txt). Markdown versions of documentation pages are available by appending `.md` to page URLs; this page is available as [Markdown](https://myty.gitbook.io/myty-kit/getting-started/5.-import-2d-avatar-assets.md).
# 5. Import 2D Avatar Assets
## TL;DR
1. [Open the Importer window](#open-the-importer-window)
2. [Open the trait mapping file](#open-the-trait-mapping-file)
3. [Set the location of PSBs](#set-the-location-of-psbs)
4. [Change the setting of Imported Assets](#change-the-settings-of-imported-psb-assets)
5. [Try the Avatar Selector and Trait Finder](#avatar-selector-with-trait-finder)
## Open the Importer window
* In the header tab, choose `MYTY Kit > Import 2D Avatar Asset` to open the `Importer 2D Avatar Asset` window

## Open the trait mapping file
1. Click the `open` button next to the `Trait mapping file` input box.
2. Locate the `Trait mapping file` that you downloaded from [2. Trait Mapping](/myty-kit/getting-started/2.-trait-mapping.md) and click `Open`.

## Set the location of PSBs
1. When you open the `Trait mapping file`, a `list of related PSB files` will be generated. For each `file name`, click `Browse` and enter the location of the `PSB file`in question.
{% hint style="info" %}
If the PSB file and the trait mapping file are in the same folder, **the location of the PSB file will be automatically entered**.
{% endhint %}

2\. Once the locations of all `PSB files` have been entered, click the `Import` button to import all assets.


3\. Import is complete. Press `OK` to close window.
## Change the settings of imported PSB assets
{% embed url="" %}
Tutorial video - How to change the settings of imported PSB assets
{% endembed %}
{% embed url="" %}
1. Imported PSB files can be found in the Project window. Choose `Assets > MYTYAsset > ImportedAvatarAssets`.

2\. Detailed settings of an imported `PSB file` can be seen in the `Inspector` window.
{% hint style="info" %}
PSB files that have editable sprites have a right-arrow icon on top of the file icon.
{% endhint %}


3\. In the Inspector window’s `Layer Import`section, check the `Include Hidden Layers`and `Use Layer Group`checkboxes.
{% hint style="info" %}
This includes all hidden layers of the PSB file, and enables the use of the layer structure.
{% endhint %}

4\. In the Inspector window’s `Platform Settings` section, change the `Max Size`to `8192`.
{% hint style="info" %}
Max Size is the maximum resolution of images imported to Unity. **It is recommended to set this to an optimum of 8192.**
{% endhint %}

5\. Apply changes by clicking the `Apply` button, located under the Inspector window’s `Advanced` section.

## Is the image’s outline jagged?
### How to change settings for anti-aliasing a jagged PSB.
1\. In the PSB file’s Inspector window, change `Texture > Filter Mode` to `Point(no filter)`.

2\. In the PSB file’s Inspector window, change `Platform Settings > Max Size` to `8192`.\

3\. Save changes by clicking the `Apply` button below the Inspector window’s `Advanced` section.\


{% hint style="info" %}
For more information on the PSB Importer, refer to the official [Unity manual](https://docs.unity3d.com/Packages/com.unity.2d.psdimporter@6.0/manual/PSD-importer-properties.html)
{% endhint %}
***
## Avatar Selector with Trait Finder
### How to use AvatarSelector
* You can use the Hierarchy window’s `AvatarSelector` object to preview each `NFT Avatar ID` .
* Try changing the `Avatar ID` in the `AvatarSelector`'s Inspector window. The Avatar ID can be changed even when the project is playing.
A demonstration the Avatar Selector
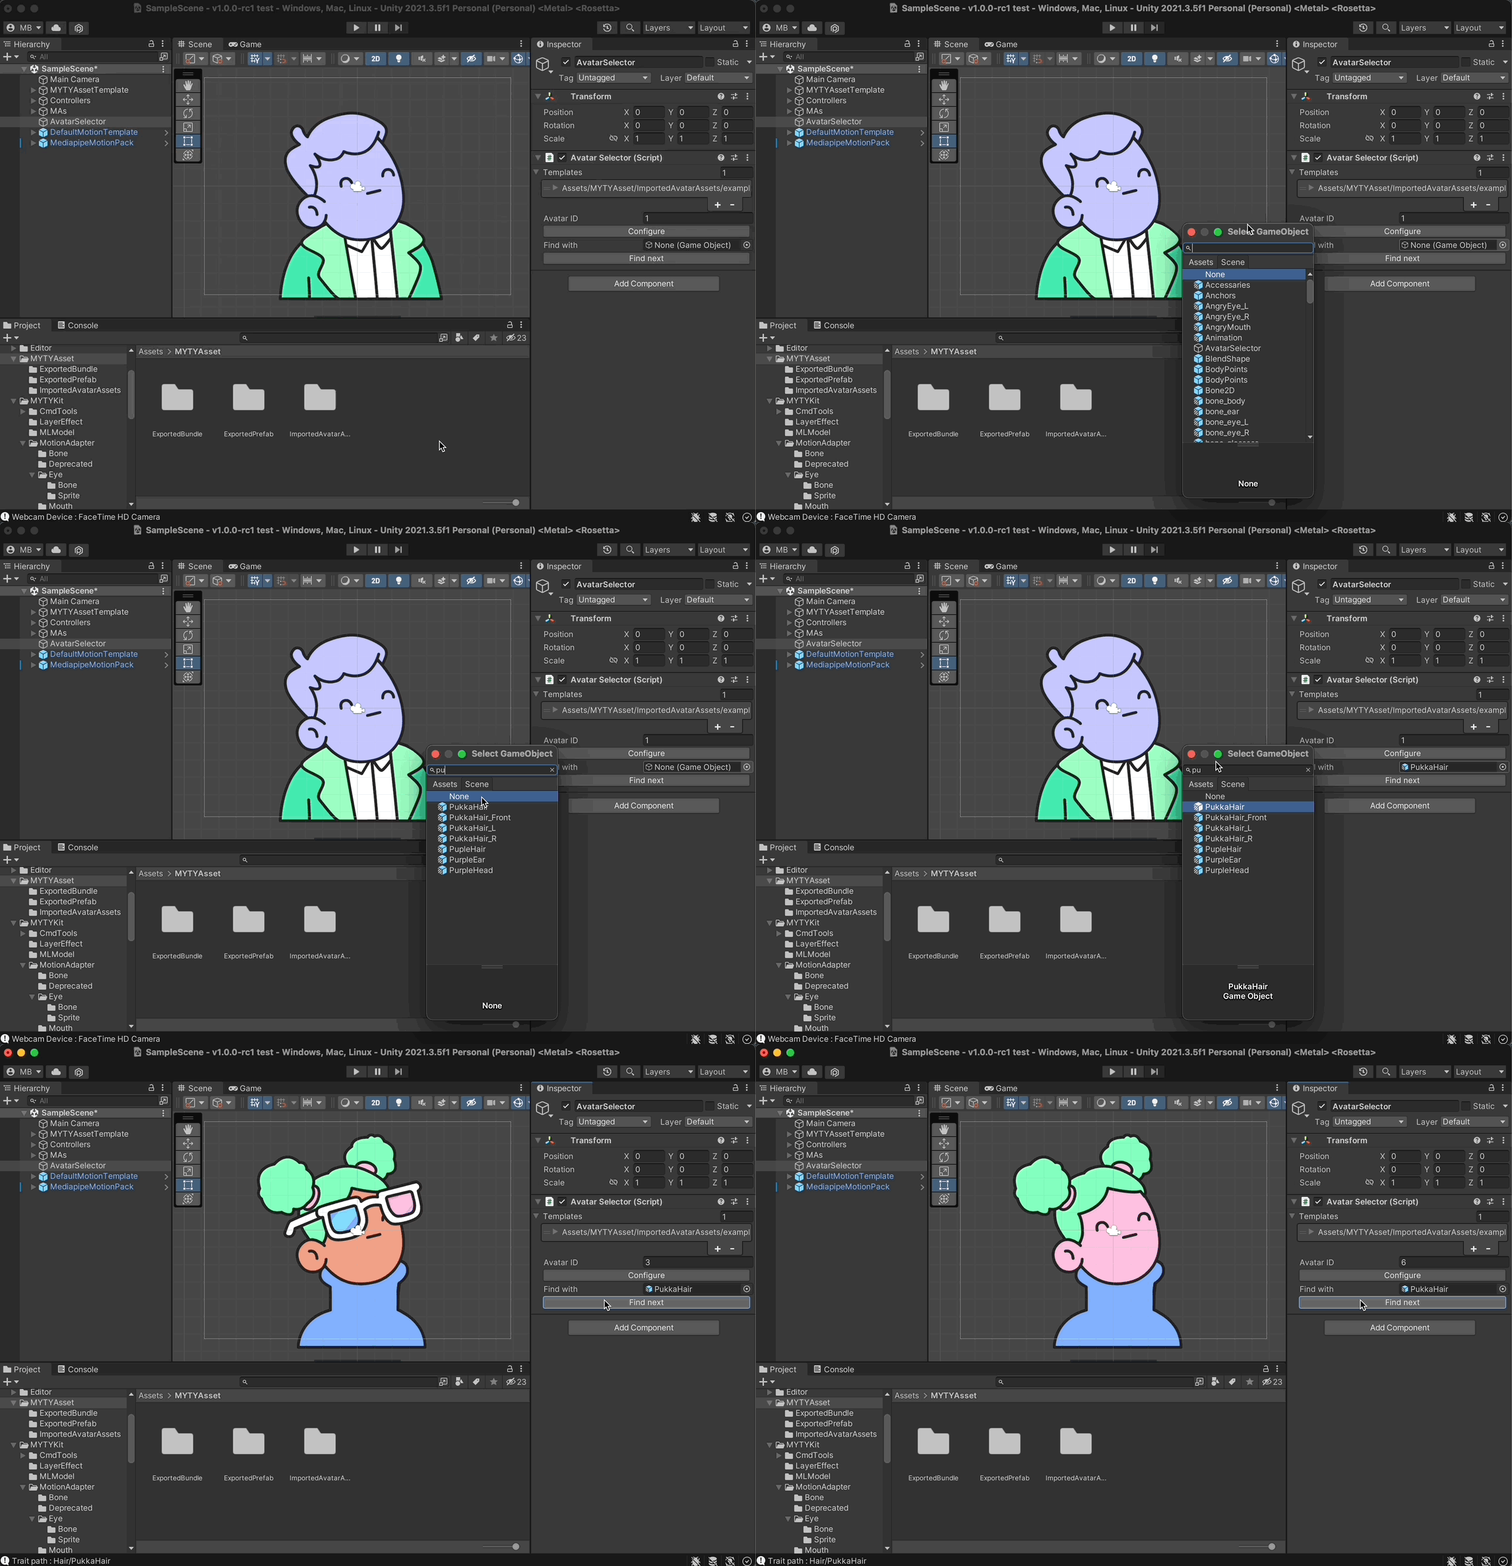
### How to use Trait Finder
* Click the ◉ icon next to the `Find with` box, search for the trait name you want to find, and select it.
* If you click the `Find next` button, the avatars containing the trait are displayed on Scene window in ID order.
{% hint style="danger" %}
Please configure your Avatar ID to the smallest number before clicking Find next.
{% endhint %}
A demonstration the Trait Finder
{% hint style="success" %}
**Have a question or an idea?** \
If you have a question to ask or an idea to share, participate in the [MYTY Kit Community](https://discord.com/invite/myty). We’d love to hear from you.:smile:
{% endhint %}