# 8. MYTY Kit Controllers
## What is a Controller?
MYTY Kit comes with a `Bone Controller` , `Sprite Controller` and `Rigged Sprite Controller`. The Bone Controller transforms the Avatar’s Bones for **bone animation.** The Sprite Controller selects Avatar’s Sprites for **frame animation**. Lastly, The Rigged Sprite Controller combines the Bone Controller and the Sprite Controller so that it can control the **bone-rigged sprites**.
Each Controller except the Rigged Sprite Controller is divided further, based on the number and function of the input variables from the motion tracking data.
* Bone Controller is divided into `Bone 1D Controller`, and `Bone 2D Controller`.
* Sprite Controller is divided into `Sprite 1D Range Controller` and `Sprite 2D Nearest Controller`.
The five types of Controllers in MYTY Kit.
* **Bone Controller**
* Bone 1D Controller
* Bone 2D Controller
* **Sprite Controller**
* Sprite 1D Range Controller
* Sprite 2D Nearest Controller
* **Rigged Sprite 2D Nearest Controller**
## Key Summary of Controllers
| | Bone 1D Controller | Bone 2D Controller | Sprite 1D Range Controller | Sprite 2D Nearest Controller | Rigged Sprite 2D Nearest Controller |
| ---------- | ------------------------------------------ | ------------------------------------------- | -------------------------------------------------------- | -------------------------------------------------------- | ------------------------------------------------------ |
| **Input** | The float value of 1 MotionAdapter Output. | The float values of 2 MotionAdapter Output. | The float value of 1 MotionAdapter Output. | The float values of 2 MotionAdapter Output. | The float values of 2 MotionAdapter Output. |
| **Output** | Transformation of **connected bone**(s). | Transform Control of **connected bone**. | Selection of appropriate **sprite image(s)** to display. | Selection of appropriate **sprite image(s)** to display. | Transform Control of **sprite mesh rigged with bone**. |
{% hint style="info" %}
For the relationship between the Controller and MotionAdapter, please refer to [6.-before-rigging](https://myty.gitbook.io/myty-kit/make-animation/6.-before-rigging "mention")
{% endhint %}
## Bone Controller
The Bone Controller transforms bones rigged to an Avatar. Bones have three transform states: Position, Rotation, and Scale. Controllers use external inputs to change the three transform states and make the Avatar move.
#### The following are defined in the Bone Controller.
* A list of bones to manipulate. (At least 1)
* conTransform state when input variable(s) is(are) at min/max
### Bone 1D Controller
This Controller manipulates Bones using 1 float value as an input variable.
* **You can use the Bone 1D Controller to make animations like these!**
1. When the user moves their eyebrows up and down, the Avatar’s eyebrows also move up and down.
2. When the user blinks, the Avatar’s eyelids also move up and down.
[→ How to use the Bone 1D Controller](https://myty.gitbook.io/myty-kit/make-animation/8.-myty-kit-controllers/bone-1d-controller)
#### Bone 1D Controller tool reference
1. `Controller`: Select the Controller you’d like to customize.
2. `Add`: Add Bones you’d like to connect to the Controller.
3. `Remove`: “Disconnect” selected Bone(s) from the Controller.
4. `RemoveAll`: “Disconnect” all Bones from the Controller.
5. `Bone List`: Display the list of Bones connected to the Controller.
6. `Control Slider`: This Slider is activated once the Input Variable’s Min and Max values and their respective Transform States have been set. You can change the Control Value to preview the Avatar’s movement.
7. `Min`: Set the minimum value of the Bone’s range of motion.
8. `Max`: Set the maximum value of the Bone’s range of motion.
***
### Bone 2D Controller
This Controller manipulates Bones using 2 float values as input variables.
You can use the Bone 2D Controller to make animations like these!
* When the user’s face moves up, down, left or right, the Avatar’s face mirrors the movement.

* When the user’s body moves left, right, front, and back, the Avatar’s body mirrors the movement.

[→ How to use the Bone 2D Controller](https://myty.gitbook.io/myty-kit/make-animation/8.-myty-kit-controllers/bone-2d-controller)
#### Bone 2D Controller tool reference
1. `Controller`: Select the Controller you’d like to customize.
2. `Recursive Selection`: Check this checkbox to include child(ren) bone(s) when adding a bone object. Unchecking this checkbox will only add the selected bone object.
3. `Add GameObjects`: Add Bones you’d like to connect to the Controller.
4. `Remove`: “Disconnect” selected Bone(s) from the Controller.
5. `RemoveAll`: “Disconnect” all Bones from the Controller.
6. `Bone List`: Display the list of Bones connected to the Controller.
7. `Control Panel`: This Panel is activated once transform states of Bones have been added using the Pivots Buttons (9). You can move the panel’s pointer to preview the Avatar’s movements in the XY axes.
8. `Position, XY Scale factor`: Position indicates the position of the Control Panel's pointer. By adjusting the scale factor, you can expand or contract the Control Panel.
9. `Reset Position`: This button resets all Bone states to the Origin values.
10. `Origin, Left, Right, Up, Down`: Set the transform values of all bones in the bone list for the Origin(al) position and the Left, Right, Up, and Down directions.
## Sprite Controller
### Sprite 1D Range Controller
This Controller manipulates Sprites based on the range of a single float’s value.
You can use the Sprite 1D Controller to make animations like these!
* When the user closes their eyes, the open-eye Sprite changes to the closed-eye Sprite.

[→ How to use the Sprite 1D Controller](https://myty.gitbook.io/myty-kit/make-animation/8.-myty-kit-controllers/sprite-1d-range-controller)
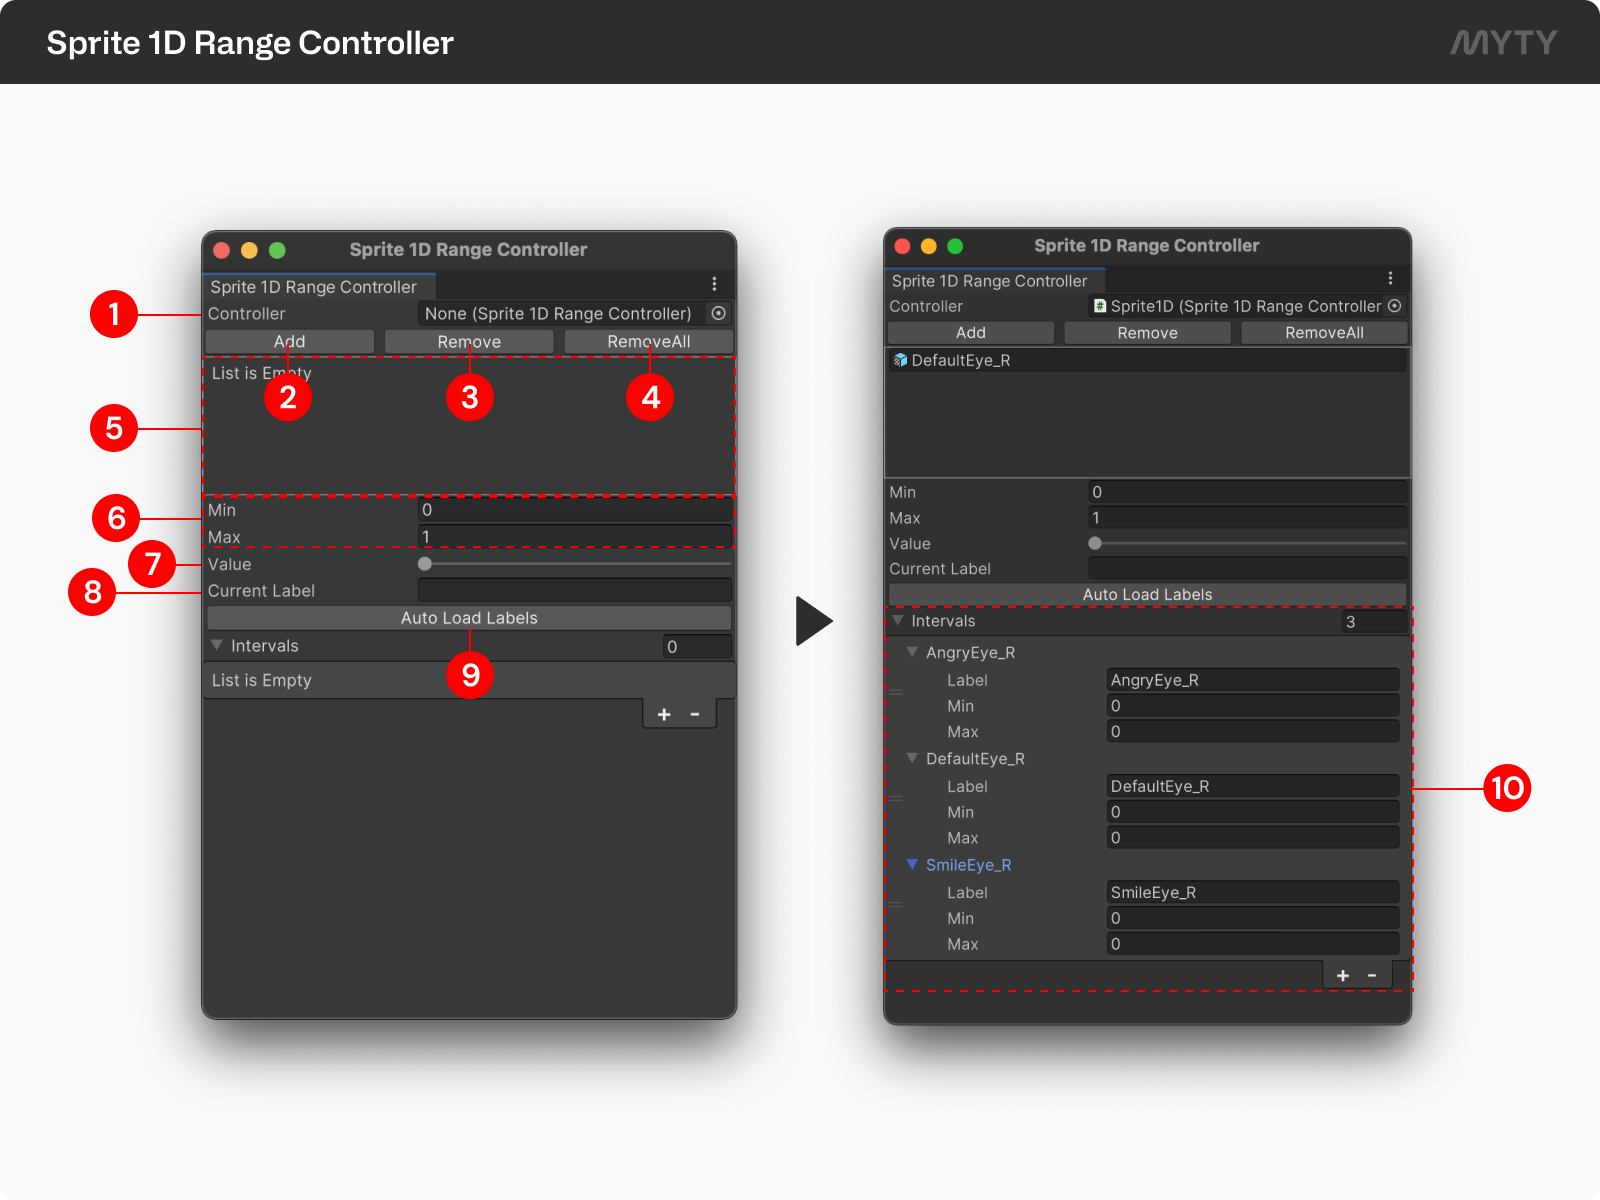
#### Sprite 1D Range Controller tool reference
1. `Controller`: Select the Controller you’d like to customize.
2. `Add`: Add Sprite Object(s) you’d like to connect to the Controller.
3. `Remove`: “Disconnect” selected Sprite Object(s) from the Controller.
4. `RemoveAll`: “Disconnect” all Sprite Object(s) from the Controller.
5. `GameObejcts List`: This displays a list of all sprite objects connected to the current Controller.
6. `Min,Max`: Set the minimum and maximum values of the motion data being fed as input to the current Controller.
7. `Value`: Modulate the motion data value being fed as input to the current Controller. This slider can be used to preview the sprite animation for a given input value.
8. `Current Label`: This displays the sprite label for the avatar currently shown in the scene.
9. `Auto Load Labels`: Automatically load sprite label(s) from the Sprite library.
10. `Sprites list`: This is a list of sprites for frame animation automatically loaded from imported assets. You can set the data value in which each sprite will appear.
### Sprite 2D Nearest Controller
This Controller takes two float values and displays the Sprites with the closest coordinate designation.
You can use the Sprite 2D Controller to make animations like these!
* When the user moves their mouth, the Avatar’s mouth Sprite changes accordingly.

[→ How to use the Sprite 2D Controller](https://myty.gitbook.io/myty-kit/make-animation/8.-myty-kit-controllers/sprite-2d-nearest-controller)
#### Sprite 2D Nearest Controller tool reference
1. `Controller`: Select the Controller you’d like to customize.
2. `Add`: Add Sprite Object(s) you’d like to connect to the Controller.
3. `Remove`: “Disconnect” selected Sprite Object(s) from the Controller.
4. `RemoveAll`: “Disconnect” all Sprite Object(s) from the Controller.
5. `GameObjects List`: This displays a list of all sprite objects connected to the current Controller.
6. `Control Panel`: This panel is activated once one or more sprite labels for an input variable value have been set. You can move the panel’s pointer to preview the avatar’s sprite animation for two input values.
7. `Current Value, Bottom Left, Top Right`: \
**Current Value:** Controls the motion data value that is fed as input to the current Controller. Moving the pointer in the Control Panel will change XY values. \
**Bottom Left & Top Right:** You can set a particular motion input value for the Bottom Left and Top Right positions.
8. `Pivot name, Pivot Position`: \
**Pivot name**: The state of the deformed sprite mesh is saved with its name. \
**Pivot Position**: The state of the deformed sprite mesh is saved in the corresponding value position.
9. `Copy Position`: Copies the position value of the current pointer.
10. `Make New Pivot`: A button that creates a pivot with a pivot name and pivot position.
11. `Auto Load Labels`: Automatically load sprite label(s) from the Sprite library.
12. `Sprite Pivots list`: This is a list of sprites for frame animation automatically loaded from imported assets. By double-clicking each pivot, You can set the data value in which each sprite will appear.
## Rigged Sprite 2D Nearest Controller
This Controller takes two float values and displays the bone-rigged sprites with the closest coordinate designation.
You can use the Rigged Sprite 2D Nearest Controller to make animations like these!
* Transform the lip sprite mesh by moving the rigged bone.
[-> How to use the Rigged Sprite 2D Nearest Controller](https://myty.gitbook.io/myty-kit/make-animation/8.-myty-kit-controllers/rigged-sprite-2d-nearest-controller)
1. `Controller`: Select the Controller you’d like to customize.
2. `Recursive Selection`: Check this checkbox to include child(ren) bone(s) when adding a bone object. Unchecking this checkbox will only add the selected bone object.
3. `Add`: Add Bones you’d like to connect to the Controller.
4. `Remove`: “Disconnect” selected Bone(s) from the Controller.
5. `RemoveAll`: “Disconnect” all Bones from the Controller.
6. `Bone List`: Display the list of Bones connected to the Controller.
7. `Anchor`: This button sets the sprite mesh based on the transform information of the selected bones. Click to switch the window to editor mode.
8. `Control Panel`: This Panel is activated once transform states of Bones have been added using the Pivots Buttons (9). You can move the panel’s pointer to preview the Avatar’s movements in the XY axes.
9. `Value, Bottom Left, Top Right`: \
**Value:** Controls the motion data value that is fed as input to the current Controller. Moving the pointer in the Control Panel will change XY values. \
**Bottom Left & Top Right:** You can set a particular motion input value for the Bottom Left and Top Right positions.
10. `Pivot name, Pivot Position`: \
**Pivot name**: The state of the deformed sprite mesh is saved with its name. \
**Pivot Position**: The state of the deformed sprite mesh is saved in the corresponding value position.
11. `Copy Position`: Copies the position value of the current pointer.
12. `Make New Pivot`: A button that creates a pivot with a pivot name and pivot position.
13. `Pivots list`: Created Pivots list.
## How to use Controllers
{% hint style="success" %}
**📌 Please ensure that you follow the following steps in order!**
{% endhint %}
### 1. Create a ControllerGroup
Before you create a Controller, create a parent object of all Controllers and name it the ControllerGroup.
1. Right click on the Hierarchy window and select `Create Empty`.
2. Rename `GameObject`to `ControllerGroup`.

3\. In the Inspector panel, click on `Add Component`, and select the **`Root`** **`Controller(script)`**and **`Controller Group(Script)`**components.

### 2. Create Controller
All Controllers follow this step.
1\. Right click on `ControllerGroup` and select `Create Empty` to create a new `Controller Object`
{% hint style="warning" %}
While you’re free to name Objects as you wish, **it is recommended that you include the name of the applicable Skeleton(Bone group) in the Object’s name.**
{% endhint %}
2\. In the Inspector panel, click `Add Component` and select the `Controller Script(s)` you want to apply.
* Applicable Controller Scripts
* Bone 1D Controller -> **Bone 1D Controller(Script)**
* Bone 2D Controller -> **Bone 2D Controller(Script)**
* Sprite 1D Range Controller -> **Sprite 1D Range Controller MSR(Script)**
* Sprite 2D Nearest Controller -> **Sprite 2D Nearest Controller MSR(Script)**
* Rigged Sprite 2D Nearest Controller -> **Rigged Sprite 2D Nearest Controller(Script)**

3\. Navigate to `Header Toolbar > MYTY Kit`and select the Controller that you'd like to use. This will open up the Controller window. You can drag its tab to the Inspector window to use it there.

### 3. Further steps unique to each Controller
{% content-ref url="8.-myty-kit-controllers/bone-1d-controller" %}
[bone-1d-controller](https://myty.gitbook.io/myty-kit/make-animation/8.-myty-kit-controllers/bone-1d-controller)
{% endcontent-ref %}
{% content-ref url="8.-myty-kit-controllers/bone-2d-controller" %}
[bone-2d-controller](https://myty.gitbook.io/myty-kit/make-animation/8.-myty-kit-controllers/bone-2d-controller)
{% endcontent-ref %}
{% content-ref url="8.-myty-kit-controllers/sprite-1d-range-controller" %}
[sprite-1d-range-controller](https://myty.gitbook.io/myty-kit/make-animation/8.-myty-kit-controllers/sprite-1d-range-controller)
{% endcontent-ref %}
{% content-ref url="8.-myty-kit-controllers/sprite-2d-nearest-controller" %}
[sprite-2d-nearest-controller](https://myty.gitbook.io/myty-kit/make-animation/8.-myty-kit-controllers/sprite-2d-nearest-controller)
{% endcontent-ref %}
{% content-ref url="8.-myty-kit-controllers/rigged-sprite-2d-nearest-controller" %}
[rigged-sprite-2d-nearest-controller](https://myty.gitbook.io/myty-kit/make-animation/8.-myty-kit-controllers/rigged-sprite-2d-nearest-controller)
{% endcontent-ref %}
## Controller Hierarchy

#### Root Controller & Controller Group
* This is the uppermost controller, and has the `Root Controller(Script)` and `Controller` `Group(Script)` components.
#### Sprite 1D/2D Controller
* Each Sprite Controller is a child element of the Root Controller, and **exists independently**.
#### Bone 1D/2D Controller & Rigged Sprite 2D Nearest Controller
* Bone Controllers and Rigged Sprite 2D Nearest Controller exist under the Root Controller. You can set Parent-Child relationships to reflect the hierarchy of desired animations and Rigged Bones. **Bone Controllers at the same level must manipulate different Bones.**
{% hint style="success" %}
**Have a question or an idea?** \
If you have a question to ask or an idea to share, participate in the [MYTY Kit Community](https://discord.com/invite/myty). We’d love to hear from you.:smile:
{% endhint %}